BioShock Wiki

Welcome to the BioShock Wiki. Log in and join the community.

READ MORE

BioShock Wiki
BioShock Wiki
(→‎New Enemies: Added Rose)
Tag: rte-source
(Undo revision 240449 by Shacob (talk) Never mind, she is seen in the Welcome Center.)
Tag: rte-wysiwyg
Line 96: Line 96:
 
*[[Rosie]]
 
*[[Rosie]]
 
*[[Spider Splicer]]
 
*[[Spider Splicer]]
*[[Rose]] (choice only)
 
 
*[[Peach Wilkins]]
 
*[[Peach Wilkins]]
   

Revision as of 19:56, 29 June 2015

For the Multiplayer Level of Neptune's Bounty, see Neptune's Bounty (BioShock 2 Multiplayer).
Neptune's Bounty

It's scientific fact, that a diet rich in fish and sea greens improves cognitive function. Don't you want to be as brilliant as you can possibly be? Visit Neptune's Bounty...
Public Address Announcements

Neptune's Bounty (occasionally referred to as Port Neptune) is the third level of BioShock. Jack reaches Neptune's Bounty by the emergency Bathysphere docked at the Medical Pavilion. His objective here is to obtain a Research Camera and pictures of three different Spider Splicers for a fisherman named Peach Wilkins in order to gain entry to the Smuggler's Hideout and escape the city with Atlas and his family.

History

Neptune's Bounty was a large fishery complex in Rapture where the vast majority of the cities fishing businesses were located. One of these businesses, Fontaine Fisheries, served as a cover for Fontaine's illegal smuggling operation.

A significant event which happened at Neptune's Bounty was the discovery of the Sea Slug which was found to produce ADAM. A fisherman with a crippled hand was bitten by one, and Dr. Brigid Tenenbaum noticed the man's hand had regenerated. It was through Dr. Tenenbaum's following experiments that ADAM, EVE, Plasmids, and Gene Tonics came to be developed in Rapture.

As the Rapture Port Authority began to crack down on the smuggling ring, it was eventually discovered who their ring leader was. This culminated in a large fight between Fontaine's followers and Ryan Security. Shocked by the huge number of citizens involved in the smuggling ring, the Rapture Central Council made smuggling a crime punishable by hanging.

In the first few weeks of the Civil War, after Atlas' "thugs" were forced out of Point Prometheus, they ran to Neptune's Bounty. They managed to keep control over the district for some time before finally being defeated by Ryan's forces.

BioShock

Main article: BioShock
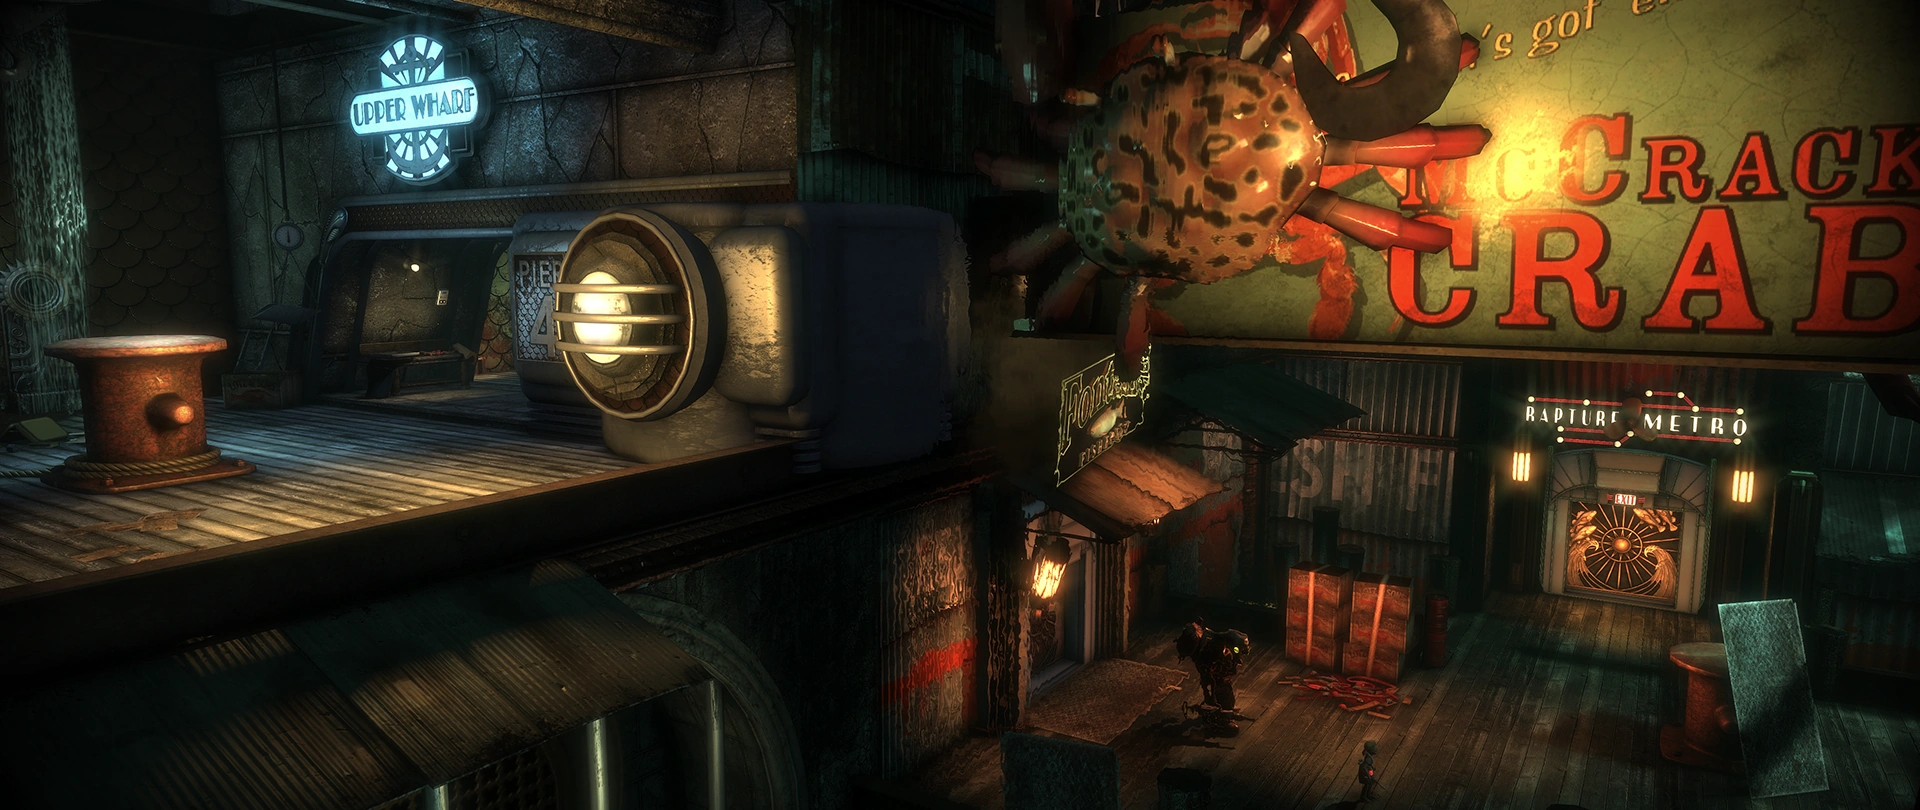
Wharf

Lower Wharf Sign

The Wharf in Neptune's Bounty is by far the largest area. Split into three parts, it was most likely the busiest part of Neptune's Bounty during the day, with the fishing subs of Rapture going in and out to deliver their fish.

Neptune wharfs

The disused wharfs of Neptune's Bounty.

In the center of the Lower Wharf, Jack can clearly see a massive mechanism. Though in disuse now, it was most likely used to load the Subs into the docks. It was here that Tenenbaum discovered the sea slug that contained ADAM. (Also a note to all players, under the wooden floor on the north side, there is an Audio Diary that gives a clue to what allows Jack to wander around Rapture).

Upper Wharf Sign

Upper Wharf is the connection point where the workers can reach the Wharfmaster, the Jet Postal or the Fighting McDonagh's tavern after a hard day at work. Upper Wharf was also likely used as the packaging and distribution area for the docks production, if the fish did not go to Fontaine Fisheries.

The Wharfmaster's Office is the highest floor of the fisheries, and was used as a police station in the docks. It was run by Sullivan, Ryan's chief of security, to regulate activities at Neptune's Bounty by enforcing the law against smuggling. Much of the area is filled with evidence tapes and files. It seems to have fallen into disuse after Fontaine was killed, and Sullivan resigned over the death penalty being instituted for smuggling.

Fontaine Fisheries

Fontaine Fisheries Logo

Fontaine Fisheries. Smuggler HQ and home of Peach Wilkins. Please keep your Plasmids active at all times. Thank you.

Fontaine Fisheries was essentially the "front" for the smugglers in Neptune's Bounty. Appearing as only a giant freezer for fish, it concealed an entrance to the Smuggler's Hideout. Enemies of Fontaine were tortured and killed here before being frozen beneath the ice; when Jack arrives he can use Incinerate! to reveal two of these people, one having tried to write It was Fontaine on the ground before dying. Peach Wilkins continued to run the fisheries even after Fontaine's apparent death, and it became a refuge for him and other smugglers during the end of the Rapture Civil War. It will be here that Jack will be forced to fight the remaining smugglers and Peach as the man's paranoia about Fontaine's "ghost" unhinges him.

The Fighting McDonagh's Tavern

Fighting McDonagh's was the place for rest at the end of a working day, possessing a fancy entrance into a normal pub/bar area (now completely in disuse) looking out into the sea. Upstairs there are three rooms. One to the right was most likely being used as a safe-house as it contains a safe, weaponry and a mattress. One the left contained only a Splicer and a dead man, chained to a bed, along with other trivial items (accessing this room springs a trap conducted by the Splicers).

The Shorten Alarms Tonic is located in room #7. A code must be entered to unlock the room. The code is located in the Upper Wharf. As soon as you go up the stairs, and through the corridor from Lower Wharf to Upper Wharf, go left. In the next big opening, there is a small waterfall near the left wall. There you will find the audio diary for Masha Come Home. The dialogue reveals the code, 7533. Use this code to open the door for room #7.

When you enter the room, you will find the audio diary Saw Masha Today. After playing it, the painting moves revealing the tonic, Shorten Alarms.

Jet-Postal Substation II

Opposite the Fighting McDonagh on the viaduct walkways is one of Rapture's Jet Postal installations, where mail was sorted and many of the mail system's network of Pneumo lines converge. Mailboxes are located in the facility. A Spider Splicer which Peach Wilkins wants researched using the Research Camera is located here.

Map

This map is interactive. Click on an icon to find out more about it, or choose a tab to see a different map.
Healthstation
Health
Station
Icon vending
Vending
Machine
Icon gathergard
Gatherer's
Garden
Genebank
Gene
Bank
Botshutdown
Bot Shutdown
Panel
Icon uinvent
U-Invent
Station
AudioDiary
Audio
Diary
Plasmid
Plasmid
Genetonic
Engineering
Tonic
Physical Tonic
Physical
Tonic
Combat Tonic
Combat
Tonic

New Discoveries

Little Sisters in this Level

Ungathered Icon Ungathered Icon Ungathered Icon

Single Use Events

New Weaponry

New Plasmids and Tonics (Found)

New Plasmids and Tonics (Available at a Gatherer's Garden)

New Enemies

Coded Doors

  • Lower Wharf - 5380
  • Fighting McDonagh, Room 7 - 7533

Audio Diaries

For Radio Messages in Neptune's Bounty, see Radio Messages: Neptune's Bounty - Smuggler's Hideout.
  1. Sullivan - Timmy H. Interrogation
  2. Andrew Ryan - Fontaine Must Go
  3. Sullivan - Bathysphere Keys
  4. Brigid Tenenbaum - Finding the Sea Slug
  5. Mariska Lutz - Masha Come Home
  6. Sullivan - Picked Up Timmy H.
  7. Andrew Ryan - Watch Fontaine
  8. Sullivan - Have My Badge
  9. Brigid Tenenbaum - Adam Discovery
  10. Bill McDonagh - Eden Leaking
  11. Brigid Tenenbaum - Fontaine's Smugglers
  12. Andrew Ryan - Death Penalty in Rapture
  13. Sullivan - Smuggling Ring
  14. Andrew Ryan - Working Late Again
  15. Bill McDonagh - Arresting Fontaine
  16. Mariska Lutz - Saw Masha Today
  17. Bill McDonagh - Meeting Ryan
  18. Peach Wilkins - Putting the Screws On
  19. Bill McDonagh - Rapture Changing

Walkthrough

Extended Walkthrough

Hallways to Lower Wharf

  • Circus of Values ("CoV") machine.
  • Check below to see what loot will be coming before buying.
  • Spider Splicer goes into hole in ceiling. Don't waste ammo.
  • Electric Buck on edge of hole.
  • First Aid Kit ("FAK") and ammo on floor.

Lower Wharf

  • The first big area is easier if saved for last. Take first door on right.
  • In bottom crate there is ammo.
  • In third uncovered grill in floor there are armor piercing bullets.
  • Hug right wall and stop before stairs down.
  • Get Electro Bolt ready and bring up Machine Gun with anti-pers. rounds.
  • Run down the stairs to the first landing, turn and shoot Splicer.
  • Move to left just enough to get Splicer coming up stairs from water.
  • Move to bottom of stairs, turn past last post, zap RPG Turret.
  • Run up the ramp and hack it.
  • Continue over and down behind Turret into...

Peach Wilkins' Room 1

  • 2 FAKs on floor, 1 on table in back, 1 in ceiling.
  • Knock on the door. Peachy starts talking. Move back to entry door.
  • Spider Splicer drops down. Evade and run in tight circles around post.
  • You cannot hurt the Splicer, just keep your health up. Help comes.
  • Pick up Grenade Launcher and leave.
  • Do not pick up FAKs if you have at least 6 already. More are coming.
  • Return to ...

Lower Wharf, 2nd Visit

  • After climbing past Turret, zap 3 Splicers down in the water (twice).
  • Use Telekinesis ("TK") to fetch their corpses for searching.
  • Pistol ammo on rim below waterfall.
  • Hack CoV machine. Electric Buck is in its tray. (More EVE is coming.)
  • FAK is often found at foot of stairs going up.
  • Continue up to Gatherer's Garden.
    • Get Health Upgrade and Plasmid slot for Incinerate!.
    • If you don't have the ADAM for a slot, use Gene-Bank on other side and
    • replace TK with Incinerate, the latter of which is essential.
  • Go left past the GG and jump through the opening down into water.
    • Blast the Security Camera, continue to right and hack Bot.
    • Drop down left side into lower water and head to back left.
    • Code for locked cell is 5380.
    • FAK, ammo, Recording: "Sullivan-Timmy H. Interrogation".
    • Splicer awaits when you come out. Zap him once and let the Bot take him.

Halls to Upper Wharf

  • As you approach entry to halls, Nitro Splicer runs by.
  • Incinerate! her and switch to TK to catch grenades.
  • Go through entry, turn right, Incinerate! 2 Splicers at top of stairs.
  • Back out and wait for them to burn.
  • Go back in. Leave FAK and EVE against wall for now. Turn right.
  • Move up to hole in floor in nook to right. Crouch and enter.
  • Pick up FAK, recording: Fontaine Must Go, auto anti-pers., 2nd FAK.
  • Start back and EVE falls from above.
  • You may be able to Incinerate! Splicers from below; otherwise...
  • Exit crawl space, turn and Incinerate! then shoot 2 Splicers.
  • Continue down halls until 2 prox.mines, cash, ammo are on floor.

Upper Wharf

  • When next door opens, peek around left side; Incinerate! distant Splicers.
  • Step back, draw weapon, wait for one to come to you or until bot finishes them.
  • EVE is behind leaning pallet facing you, if you need it.
  • Continue to table with FAK and recording: Finding The Sea Slug.
  • Next section on the right overlooks Lower Wharf:
    • Climb onto the ledge below and look right at EVEs and a FAK.
    • To the right on the edge of the crab sign is some Electric Buck.
    • A FAK can be seen sparkling in the distance to the left of the second EVE.
    • Right next to the first EVE and FAK there is a beam crossing over the
      • pier onto another ledge with a crate with some frags.
    • Cross beam and ledges back to Upper Wharf.
  • Continue along right wall until almost to vertical pipes.
  • Round corner, zap-hack RPG Turret.
  • Big Daddy Battle
    • Many strategies work. Example: use Proximity Mines, frags, gas tanks.
    • Lure the Big Daddy into an area where the hacked RPG Turret can help you.
    • Enrage one BG to kill the other: Get on the top wharf. Look down. Shoot the lower one. Go down and lure him up to near the other BG. When they're close, use Enrage on the one who you agro'd from above. Make sure they're about the same health level by shooting the stronger one. In the end you'll have two Little Sisters with very little ammo usage.
  • On floor: Recording: Masha Come Home, ammo
  • Corpse: Recording: Picked Up Timmy H.
  • If you have at least 160 ADAM after killing the Big Daddy, you should really
  • go back down to the Gatherer's Garden for a Plasmid slot and Target Dummy.
  • Approach locked gate behind Turret from the left.
  • Pistol/Machine Gun shoot the lock and hug left wall.
  • Splicer will come out. Shoot once and RPGT will finish her or do it yourself.

Stairs to Wharfmaster's Office

  • At top of stairs is an unreachable Security Camera.
  • Edge past corner and destroy it.
  • Ammo on floor at right of room.
  • 1 Frag on ledge opposite base of stairs (up high), use TK to grab.
  • Recording by CoV: Watch Fontaine.
  • Before buying at CoV:
    • Coming soon: 4 FAKs, 1 EVE, 4+ frags.
    • Also note that back at Peach's, you will lose a lot of excess standard ammo
    • and all non-standard ammo such as Proximity Mines, but you will get all the
    • FAKs and EVE you can carry plus several Automatic Hack Tools.
    • So you probably do not need to buy any more FAKs or EVE here.
  • Continue to Security Camera on left. In corner behind post: 3 frags.
  • Next stairs lead to a locked door on the right. This is the ...

Wharfmaster's Office

  • Challenge: Try to hack 4 Turrets and Security Camera without losing one.
  • Break lock. Save game.
  • Turret #1:
    • Run down the hall to the right, zapping then hacking RPG Turret.
    • Immediately back up just a few steps to avoid Turret to the left.
    • Back against wall to give RPGT room to blast Splicer coming in.
  • Turret #2 (without Target Dummy):
    • Run back the way you came in, turning right at hall.
    • Run down hall and zap the Machine Gun Turret BUT ...
    • Keeping going and zap-hack the RPG Turret to its right.
  • Turret #3:
    • Immediately when done, turn, re-zap the other Turret and hack it.
    • If you hack the first Turret first, it will shoot the unhacked RPGT.
    • This way, none of the Turrets fire at each other.
  • Security Camera:
    • Just turn around and hack it.
  • Turret #4:
    • Move past the RPG-Turret to end of the hall. The last Turret is in a nook.
    • Turn left into nook and zap-hack. Mission accomplished.
  • This is much easier with Target Dummy.
    • After first Turret, go back down the hall by the desk.
    • Turn and put a target in the middle aisle to decoy middle RPGT and Camera.
    • Run down the next hall as in #2, but hack the first Turret.
    • Turn and hack the RPG Turret to the right while it is still firing at the decoy.
    • Hack the camera.
    • For Turret 4, put a target out away from you and hack it.
  • Hole in wall by #4: prox.mine, 2 FAKs.
  • Left cell in middle, going back: EVE in sink.
  • Other cell: BD corpse with big cash, Health Station.
  • Crawl Space between entry door and Machine Gun Turret:
    • Blast Security Camera with Shotgun.
    • Recording: Have My Badge, Grenade Launcher with 5 Grenades.
    • Safe: Easy. 3 Anti-Personnel Rounds, 2 Heat-Seeking RPGs, $33
  • Circle the area to loot the Splicers which have been getting killed.
  • Break lock on last cell, crawl through hole in wall to ...

Interrogation Rooms

  • Follow halls to office with Research Camera.
    • From now on, ALWAYS have your camera ready to shoot.
    • Always take two pictures per subject for Research Credit.
    • If time allows, you may get credit when taking a third picture of same foe.
    • Credits get best perks in the game. Read the Research Camera page.
  • 2 FAKs next to camera.
  • Take 3 pics of Splicer in the next room. (3rd may take several tries.)
  • Just take 2 pics of burning Splicer around the corner.
  • Switch to a weapon and finish him off.
  • Go to broken window and photograph Splicer and camera.
    • Go just far enough to pick up Security Bullseye Plasmid.
    • Temporarily replace Incinerate! with it.
    • Hit Splicer with Bullseye and take pictures of Bots and Splicer.
    • Go back in window, go to Gene-Bank, and put Incinerate! back.
    • Use TK to pick up ammo and FAKs and drop down below.
    • Go back out window, turn right and work your way down.
  • Blast Security Camera. Ignore ammo machine. Ammo disappears soon.
  • Recording: ADAM Discovery.
  • Weaken Big Daddy
    • Note that you are in a locked area next to the Upper Wharf.
    • You can freely chip away at a Big Daddy with various abundant ammo.
    • Stop when his Health reaches 25% so that you can easily finish him later.
    • Sadly, you are low on Film, so take his picture later.
  • Continue on to ...

Halls to Jet Postal

  • Recording: Eden Leaking, lock box, auto anti-pers., FAK behind water.
  • Security Camera on right in glass passageway.
  • Put a Target Dummy in front of Security Camera.
  • After hacking, two Splicers attack decoy.
  • Get down and back up the way you came behind a post to let Bots help.
  • Photograph Splicers and bots then help kill Splicers.
  • Recording: Fontaine's Smugglers. 2 Pep Bars below it.
  • Turn right to go to ...

Jet Postal

  • Walk up to the door on the right and turn around clockwise, you'll see some Film.
  • Two Splicers will come to the door. Photo and kill them.
  • Turn around and loot the front room:
    • Film. Recording: Death Penalty In Rapture.
    • Use TK to get 3 corpses hanging from ceiling: some FAKs and 3 Exploding Buck.
  • Back room, front half:
    • Camera/Film, FAK, ammo, cash reg., Pep Bars, Film.
    • Jump up between last two Pneumos and look for signs of a Spider Splicer.
    • Just keep aiming the camera at ceiling in front of Security Camera and snapping.
    • Use Shotgun to blast Security Camera.
    • Splicer should come around, take more pictures (another 2 possible).
    • Should earn perk: Spider Splicer's heart transforms to FAK.
    • If perk not earned yet, don't loot Splicer's heart.
  • Back room, back half:
    • Bandages, prox.mine, cash, ammo, Film in destroyed Security Camera.
  • Coming soon: FAK=3, EVE=3, frags=4, prox.mines=7, lots of cash.
    • So at CoV machine, limit yourself accordingly. Have 50-60 Film.

Glass Passageway

  • Shoot a Proximity Mine at the bottom of each set of stairs as you pass by.

Fighting McDonagh's Tavern

  • Have camera ready, snap (twice) as soon as the door opens.
  • Two Splicers inside. Photo and kill.
  • EVE on ledge to right above crawl space, 00 Buck on beam to right of entrance door.
  • Enter water at right, go in crawl space. Recording: Meeting Ryan, 00 Buck, Pistol Rounds.
  • Flooded room:
    • 2 Splicers (zap water, take pics), Security Camera, Health Station.
    • Frag, 00 Buck in corner near camera (not on Hard). Film, bandages.
    • Go up stairs and take door on right.
  • Back room:
    • Desk: Film, recording: Rapture Changing.
    • Crawl space:
      • Machine Gun Turret. Photo twice, zap and hack.
      • Get out of the way after hacking while it shoots Splicers.
      • FAK by entry, 3 frags.
      • Safe: Medium-. Automatic Hack Tool, 4 prox.mines, 3 elec.buck.
    • Exit room, zap broken door control.
  • Bar:
    • It is hard getting up the stairs and around the bar with 2 Splicers shooting.
      • Instead, go back to the flooded room and out the crawl space you came in.
      • If you are low on FAKs or EVE (usually only if playing on Hard), use the CoV.
      • Go up the steps to the bar.
      • Place a Target Dummy across the room, go right, photograph-kill Splicers.
    • Recordings: Smuggling Ring, Working Late Again
    • FAK inside post with water spraying.
  • Downstairs restroom:
    • Nitro Splicer, photo twice, kill, back away from explosion.
    • First stall, pay $5 and find 2 prox.mines and EVE.
    • If maxed out on either, use TK to move then out by stairs.
  • Upstairs hall:
    • Fire a Proximity Mine at the first set of stairs (on the left).
    • Splicer at end of hall. Photograph and kill.
    • Nitro Splicer from stairs at left. Try to lure him into the prox.mine.
    • Photo, use TK to throw back Grenades.
    • FAK on floor. Set prox.mine at bottom of each stairs to next level.
    • Health Station at end of next level hall. Hack or shoot.
  • Room 5:
    • Set a Proximity Mine outside the door.
    • Prox.mine, EVE, Elec.Buck in front of room
    • Safe: Medium. 45 Armor Auto Rounds, 3 Elec.Buck, EVE
    • When you exit, Spider Splicer attacks. Get pics.
  • Room 7:
    • Door lock code = 7533.
    • Shorten Alarms tonic after poster falls off wall.
    • Recording: Saw Masha Today, About $50 cash.
  • Room 6:
    • Place Proximity Mine inside near the door.
    • Splicer in back corner.
    • Pictures may earn Static Discharge 2, a very valuable tonic.
    • FAK, Recording: Arresting Fontaine
    • 2-3 Splicers will attack.
  • A few Splicers will still be roaming the area for you to kill,
    • including a Splicer-bot pair.
  • Hang around until you find a BD-LS pair and kill BD, which is #2 of 3.

Back to Glass Passage

  • Splicer, Turret gun. Photograph them all.
  • It is important to photograph all Turrets to earn "instant hack" ASAP.
  • If you need more FAKs or frags, go to the CoV in Jet Postal.
  • But remember that more FAKs/EVE than you can carry are coming up.

Upper Wharf

  • Stay by door from flooded hall into Upper Wharf to wait for Splicer.
  • He is very tough (on Hard). Frag him ASAP. Others may come around.
  • A Nitro Splicer may be in the rooms above, throwing frags at you.
  • Gate through which you previously shot Big Daddy is now unlocked.
  • Finish off Big Daddy (when Little Sister is with him).
  • If your FAKs are low, CoV is through gate by Turret gun.
  • Going back, shooting a Health Station adds another FAK.
  • Head back down to ...

Lower Wharf

  • Visit Gatherer's Garden:
  • When you approach Wrench Lurker tonic, a Spider Splicer attacks.
    • She is very tough and hard to kill.
    • If there is a Big Daddy upstairs, the player may lure the Spider Splicer upstairs and enrage it for the Big Daddy. This way, the player can research without fighting.
    • Her loot: 2 Automatic Hack Tools, FAK, 3 EVEs.

Peach Wilkins

  • Enter and Incinerate! ice with Focused Hacker tonic and EVE.
  • On floor: EVE and FAK.
  • Gene-Bank: Have Enrage, Incinerate, Electro Bolt and Target Dummy.
  • Telekinesis will not be needed and can be returned later.
  • Next room: melt ice on right for Automatic Hack Tool, FAK.
  • Stand on left side of next door but don't go through.
  • Many strategies are possible. Below is one. Save to retry.
  • The battle sequence starts as soon as you enter this room.

Peach Wilkins Battle

  • See two round freezer doors to the right.
  • Run to the dark area between them.
  • Auto-hack the Security Camera. Lights will dim.
  • Turn right and go in the dark until you reach the wall, then...
  • Turn left and go until you reach a crate.
  • Jump onto the crate and then turn right and jump onto a platform.
  • A door in front of you has a Machine Gun Turret behind it.
  • Move to the right where metal plates provide cover and crouch.
  • Wait until you hear Splicers, then set a decoy off to the right.
  • Turret door opens, zap-hack Turret.
  • If Splicers get where they can see you, Enrage or Incinerate! them.
  • Keep this up and watch your Health until the battle is over.
  • Aftermath:
    • Keep Incinerate! handy when you step down for any stragglers.
    • Turn left and down stairs to get your weapons back.
    • Bring up each weapon to get them loaded.
    • Notice you have lost all non-standard and much standard ammo.
    • Come back up and loot battle area, freezers, and prior rooms.
    • You may have to melt ice around freezer doors.
    • Back-right of freezer nearest stairs:
      • Melt ice in back to crawl thru.
      • Melt ice in back to get to other freezer with cash and Hack Tool.
    • Use Gene-Bank to put back Telekinesis or make other adjustments.
  • Loot: 8 EVEs, 4 FAKs, Auto-hacker, $120
  • May still be EVE, FAKs, Auto-hack, and ammo in outer rooms.
  • Clearly, you are going to be leaving EVE and FAKs behind.
  • Downstairs:
    • Power To The People dead ahead. All choices are good.
    • Freezer to the left: 2 Splicers. Safe: ammo, Hack Tool.
    • Recording: Putting The Screws On. Two Pep Bars.
    • Under stairs in ice: ammo

Return for Ammo and Lower Wharf

  • Go back out through Peach's to the RPG Turret (now broken).
  • You will hear/see a Splicer beyond the Turret. Incinerate.
  • She will run to the water where you can zap her. Search for loot.
  • Go up by the Gatherer's Garden, past to the stairs to Upper Wharf.
  • Turn right and go back to Jet Postal.
  • You may bump into some Splicers along the way.
  • At Jet Postal, get 6 Proximity Mines from the CoV.
  • As you go, pick up any ammo previously left behind.
  • Go back down to the first Lower Wharf area.

First Lower Wharf Area

  • Go through the door, turn left, and jump down below the wharf.
  • Turn and see the red light of a Machine Gun Turret.
  • Decoy or zap Turret, photo and hack it.
  • Hug right wall and cross open area to 2nd wharf.
  • Decoy or zap Turret, photo and hack it.
  • Under wharf: EVE, FAK, ammo, Recording: "Bathysphere Keys".
  • Middle area: FAK, Medical Expert tonic.
  • Splicers and Turrets will fight. Take "snap-shots".
  • Also photo a Big Daddy.

Exit, Freezer Right

  • Head back to the downstairs area of Peach's where we left off before.
  • Melt the ice on the right-side freezer.
  • In the back, melt ice twice to get to Smuggler's Hideout


Video

Neptune's_Bounty_Multiplayer

Neptune's Bounty Multiplayer

Neptune's Bounty in the BioShock 2 Multiplayer

Bugs/Glitches

  • This level is one of the locations of the extra Little Sister bug.
  • With the Xbox 360, if the player downloaded the 1.1 patch and DLC and loads the Plasmid Sonic Boom at the Gatherer's Garden, the player may experience the fourth Little Sister glitch in this level. A possibly related side effect off this is that the player cannot pick up ammo, even if the player's weapon is not at full capacity, until all of that ammo type has been discharged.[confirmation needed]

Gallery

Behind the Scenes

  • The area of Neptune's Bounty that Jack visits during the events of BioShock is listed as Pier 4 on a number of signs on the Upper Warf. This would suggest that there are larger portions of Neptune's Bounty that the player does not have access to.
    • The Rapture Metro map also shows that Neptune's Bounty has at least 4 bathysphere stations, with the fourth being the nearest to Arcadia and linked to it by a secondary route.
  • Despite the fact that Atlas had originally planned for Jack to go directly to Neptune's Bounty from the Transit Hub in Rapture's Welcome Area, nowhere in Neptune's Bounty will the player find a passage leading to the Welcome Area. There are not even any locked doors or blocked hallways which might lead to other areas in Neptune's Bounty containing such a passage.
  • In one of the lower rooms of Fighting McDonagh's Tavern, a Big Daddy can be observed outside a window. If one were to go into No-Clip Mode (PC/Mac Only) and pass through this window, they'd find this Big Daddy to have fully functional AI. Upon attacking the player, it will return to speeds comparable to being out of water.
  • In Roman mythology, Neptune is the god of water and the sea and his bounty is the sea food, hence the name of this district of Rapture (the Greek equivalent is Poseidon).