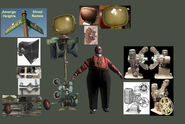
A Control Point.
During the Turf War game mode of BioShock 2 Multiplayer players are split into two teams: Team Atlas and Team Ryan, and are tasked with capturing and holding the control points present in the level. A player standing close to a neutral or enemy control point will gradually charge up a meter, which will earn the player's team the control point if it fills up completely. The team that managed to maintain control over the most points for the longest amount of time by the end of the match wins.
Strategy[]
- As the player is often killed close to the Control Point, the Gene Tonic Death Trap comes in handy, eliminating the Splicer trying to take over the Control Point.
- Fast Feet, Aero Dash and Leg Up can be used to access Control Points faster.
- Geyser Traps can be but close to the Control Points or access ways to get rid of enemies (extra damage if powered with Electro Bolt). They can also be used as a jump-boost.
- Houdini can be used to take over a Control Point without the enemy seeing you. The EVE Saver Gene Tonic is recommended if using this Plasmid, as it drains the players EVE quickly.
Control Point Locations[]

|
"The slugs alone could not provide enough ADAM for serious work. But combined with the host...
now we have something." - Brigid Tenenbaum This article, or section of an article, is a stub.
It is too short to provide more than rudimentary information about a subject. Would you kindly help this wiki by expanding it? |
Arcadia[]
- 1 in the Tea Garden, near the Farmer's Market entrance.
- 1 in the Rolling Hills, in the middle of the main room.
- 1 in Arcadia Glens, on the bridge over the flooded concourse in the north of the Glens.
Dionysus Park[]
- 1 in the Imago Fine Arts gallery.
- 1 in the Promenade.
- 1 in Cohen's Collection.
Farmer's Market[]
Fighting McDonagh's[]
- 1 in the Brewery upper level.
- 1 in the center of the Boxing Ring in Tavern.
- 1 at the Back Entrance.
Fontaine's Home for the Poor[]
- 1 in the lower central part of the Courtyard.
- 1 in the Apartments on the second floor.
- 1 on the central balcony on the third floor.
Fontaine Fisheries[]
- 1 in Deep Freeze.
- 1 in Dry Storage.
- 1 on the Warehouse Main Floor.
Fort Frolic[]
- 1 in the middle of the Lower Mall, between the Tobaccoria and Eve's Garden.
- 1 in Eve's Garden upstairs.
- 1 in the Casino upstairs, near its south entrance.
Hephaestus[]
- 1 in Geothermal Control.
- 1 at the base of the Core.
- 1 in Heatloss Monitoring.
Kashmir Restaurant[]
- 1 in the Kashmir Reception, near the restaurant's entrance.
- 1 in the Dining Foyer, near the large cake in the center of the room.
- 1 in the Silk Lounge, near the crater on the floor.
Medical Pavilion[]
- 1 inside the Twilight Fields Funeral Homes.
- 1 inside Dandy Dental.
- 1 downstairs in the Crematorium.
Mercury Suites[]
- 1 in the Lower Atrium, near the check-in lobby.
- 1 in the Upper Atrium, on the bridge, in front of the elevator shaft.
- 1 in the Penthouse Suite, in front of the blocked door to the west on the staircase.
Neptune's Bounty[]
- 1 In the middle of the "Shops" Area Pit.
- 1 Under the dock holding the RPG turret in the Lower Wharf.
- 1 in the Metro Entrance, at the beginning of the hallway leading to the Upper Wharf.
Point Prometheus[]
- 1 in the Museum Entrance, outside of the Supervisor's Office.
- 1 in the Coral Display, infront to the squid display. (not to be confused with the Kraken Exhibit)
- 1 in the Oddities Wing, infront of the main entrance to the Kraken Exhibit.
Pauper's Drop[]
- 1 on the roof of The Hamilton, near the vending machine.
- 1 in the The Sinclair Deluxe bedroom.
- 1 in the bottom floor of The Hamilton.
Siren Alley[]
- 1 on the Main floor in front of Joe's Green Groceries.
- 1 in the Upper Rooms in the room with the guitar by the breakable wall.
- 1 on the Main floor by The Pink Pearl.
Smuggler's Hideout[]
- 1 in Central Control 1.
- 1 in SubBay Number 1.
- 1 in Central Control 2.
Video[]
Gallery[]
An early design, with Buck Raleigh as scale.
Behind the Scenes[]
- The Control Points were designed by Will Makra.[1]


