
- “Sure, the boys in Ryan's lab can make it hack-proof. But that don't mean we ain't gonna hack it.”
- ― Pablo Navarro[src]
Hacking is a method of interacting with various machines in BioShock, BioShock 2 and BioShock 2 Multiplayer. This may be done to gain access to a locked area, unlock safes, reduce prices at vending machines or turn a hostile Security Device to be friendly towards the player.
BioShock[]
- Main article: BioShock
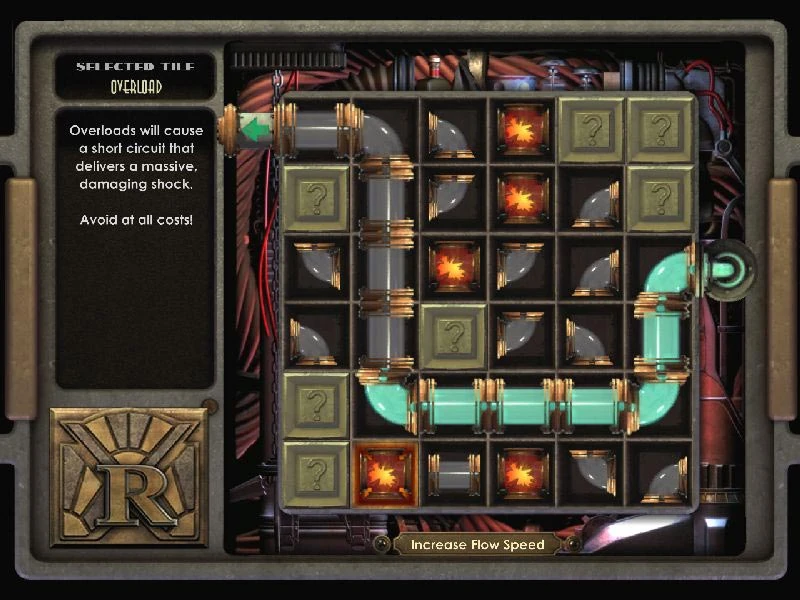
The "Pipe Dream" hacking minigame.
To hack a system, one can:
- Play a minigame using Straight Tiles and Elbow Tiles to make a path from start to end, similar to Pipe Dream.
- Buyout the machine with money.
- Use an Automatic Hack Tool.
Effects[]
Things that can be hacked in this manner are:
- Number Locks (a few exceptions)
- Safes
- Security Bots (they follow and fight for the player, max 2)
- Security Cameras (will detect wandering enemies and send Security Bots after them; Big Daddies are immune unless tagged with Security Bullseye)
- Turrets (shoots enemies who wander too close, including hostile Big Daddies)
- Vending Machines (price lowered to ~80% and new items are available)
- U-Invent (component cost lowered by 1 per object to a minimum of 1)
- Health Station (cost lowered to $10, also deals damage to enemies who try to heal there)
Notes:
- A player who frequently hacks Health Stations may notice that enemies who use it will die. This is because Splicers who go to heal there are severely injured.
- Researching Security Bots and Turrets at level 4 will enable the player to instantly hack those devices without having to go through the minigame (see below).
Controls[]
With keyboard and mouse, clicking a tile uncovers it, dragging a tile over an uncovered tile swaps the two tiles, clicking the Increase Flow Speed button rapidly increases the rate the liquid flows through the puzzle and should only be used when the puzzle has been solved.
With a controller, the left analog stick or the directional pad moves the cursor, the A/X button either uncovers a tile or swaps the highlighted tile with the tile that is currently stored in the swap box and the Y/Triangle button greatly increases the flow rate (for when the player has finished solving the puzzle).
Difficulty[]
The difficulty of the game changes depending on what the player is hacking, how far on they are in the game, what Engineering Tonics the player has equipped and if the device being hacked is frozen (freezing a hackable device significantly slows down the liquid). The difficulty ratings are not absolute. Sometimes a "medium" difficulty hack can be nearly impossible, while a red-zone hack will not be all that hard. Before wasting a hacking tool, try a manual hack first, even on maximum difficulty hacks. If the player has a tonic in the Hacker's Delight line, they will get back some/most of the Health they lost on the failed manual attempt. It will sometimes happen that the layout is such that it cannot be solved because all routes to the exit are blocked. Other times one may find that the only route would have required changing the first tile to start the flow in the opposite direction and it is too late by the time the player discovers this.
The difficulty of a system being hacked is reflected by the number of Overload Tiles, Alarm Tiles, Resistor Tiles, and Acceleration Tiles, and the speed of the fluid running through the tubes, or the amount of cash to be spent. Automatic Hack Tools are unaffected by any difficulty level.
General Tips[]
- Freezing a machine (Turret/Camera/Bot) before hacking will slow the flow rate.
- Each hackable object has its own starting configuration and size. The different layouts are:
- Security Bot and Turret
- Security Camera
- U-Invent
- Health Station
- Safes and door combination locks
- El Ammo Bandito and Circus of Values
- Safes must be explored quickly, as even with Speedy Hacker, it won't be long before the fluid begins pumping, and the initial configuration is poised to fail quickly.
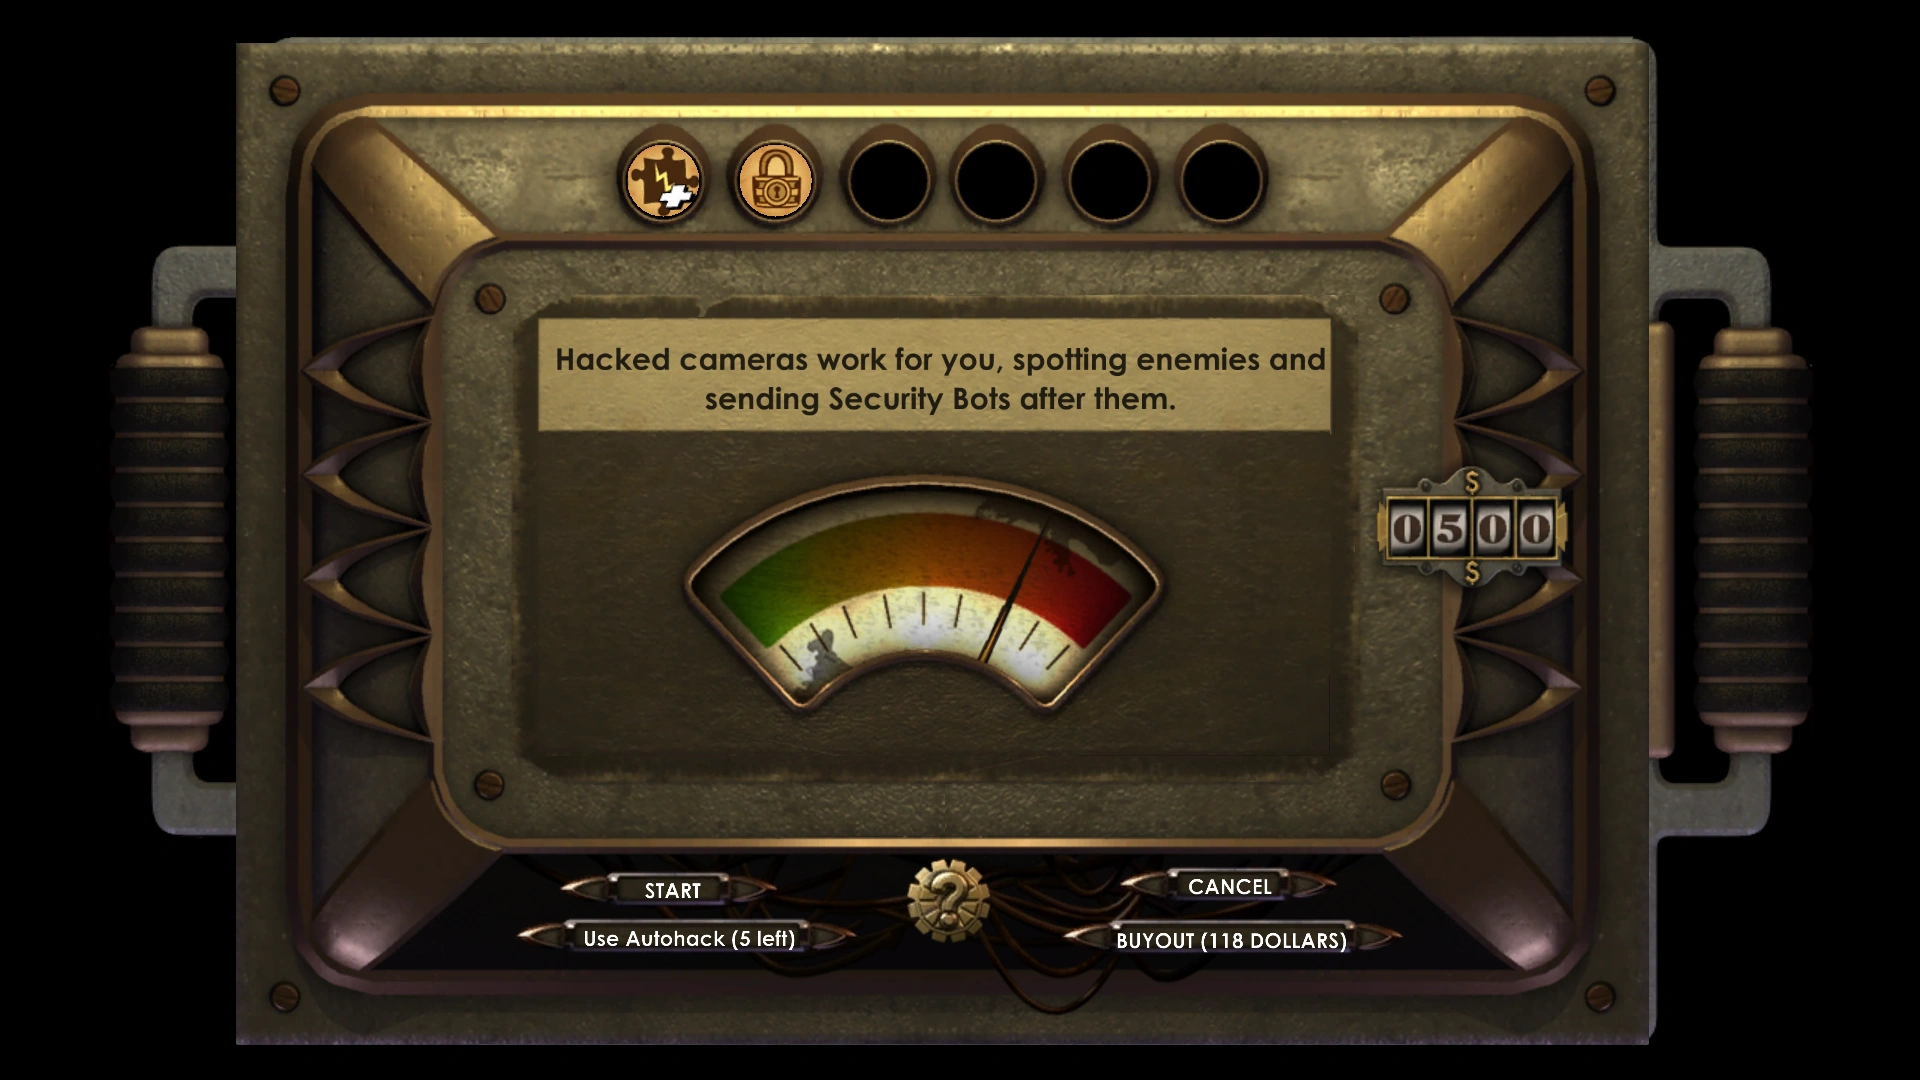
- Pay attention to the meter on the screen before one decides to hack: The closer the needle lies to the red area, the harder a device is to hack.
- If a winning solution cannot be found, make sure that the liquid will not come into contact with an overload or an alarm tile before it short circuits. These are worse outcomes than just failing (an alarm will summon Security Bots to attack the player—however, this sometimes can be used to one's advantage, as described in the Security Bot article). If the player sees the possibility that this may happen, put a random tile in the line of flow to block it before it hits an alarm.
- The minigame screen does wrap, so the player can quickly get to the opposite side. For example, if one is at the top, and there is a piece at the bottom, just go up once more to appear at the bottom. This can save those precious seconds.
- On the PC, the player can quick-save with F8 before attempting any hack. If one fails the hack, reload with F9.
- Rarely should the player move a tile anywhere except to the next square in the starting string of tiles. This maximizes the time one has to uncover more tiles.
- If one has to move a tile over several squares, use that time to glance back at what one has already done to look for errors. The most common error is when the player wants to put a particular tile in a specific spot. If that spot has a piece of pipe showing, one click will replace that piece with the active piece, but if the spot has a tile that hasn't been turned, the first click turns the tile over and one must click again to replace it. So if the player is in a hurry, clicks once and doesn't notice that the tile didn't get replaced, they risk failing the hack.
- When the player thinks they are done, don't press Y/triangle until after looking back over the layout to make sure it is correct.
- On easy difficulty, it is an advantage to hack when the player's health is low because a failed hack takes away some of their Health, but it will never lower it to zero. One can retry hacks as many times as they want with their Health bottomed out. Just don't forget to use a First Aid Kit once the hack is completed.
- Most Medical Stations are relatively easy hacks, so if the player has Hacker's Delight and their Health and/or EVE are a little low, hacking a Medical Station is a good way to give them a boost, even if the player doesn't want a full shot from the station. Hacking the station also has the advantage of having it poison any Splicers who try to use it.
Hacking Strategies[]

User interface for Hacking objects.
Strategy 1[]
At the start, uncover 3-5 rows or columns of Hidden Blocks, find the pipe you need and place it. Keep going until the player reaches another row or column or hidden blocks. Uncover 2-3 rows/columns and take what pipes one needs. Repeat until one reaches the end. If the liquid is in the middle, press Y/triangle, but makes sure all pipes are connected and lead to the end.
Strategy 2[]
Uncover the complete path from beginning to end first! This is crucial to the player's success as one needs to uncover those spaces anyway. Benefits of uncovering one's path first include knowing any obstacles that are in the path and knowing what pieces the player needs. Once uncovered, start by replacing the pieces closest to the beginning as possible, to make sure there is enough time to finish the rest.
Strategy 3[]
Rapidly uncover the entire grid as soon into the puzzle as possible. This not only avoids surprises from short-fuses or alarms mid-solution, it also allows the player to visually scan for the piece they need next, and it enables them to swap any two board pieces right away, thus lowering the risk of making an error by forgetting to switch out a tile after they've revealed it. One may need to scramble a bit after a few rows to ensure that the initial segment of pipe has enough length to buy the player time for extra flipping, particularly on the hardest puzzles which start with a very limited pipe route. Select the piece that the player wants to replace first (known endpoint) while scanning the area visually for its replacement, then rush to the newly found piece and trade the two. Stick resistors as early in the route as possible to increase flexibility for piece rearrangement later in the pipe.
Layout is a Factor[]
The layout of safes simply does not allow time for the flipping of a lot of tiles as suggested above, even on Medium or Easy. Layouts which start on the right and go down and the exit on the top-left can be tricky because the player needs to find a top-to-left elbow tile quickly. Security Camera layouts are the easiest. Even on Medium or Hard difficulty, there is plenty of time to run across the top from right to left, down the left column, then back up the 2nd column flipping tiles before one has to start looking at what to move.
Recommended Plasmids[]
- Electro Bolt will temporarily stun machinery, allowing the player to initiate a hack. However, it will also deal damage to the device.
- Winter Blast will temporarily stun machinery and slow down the flow of the liquid while hacking. It also has the advantage of not dealing any damage to the device (Note: This works both on security devices and vending machines).
- Target Dummy will temporarily distract any security device in the area, allowing the player to hack them all. This does not deal direct damage to the device, however, if there are several machines they may accidentally shoot each other.
Recommended Gene Tonics[]
- The Alarm Expert, Hacking Expert, Safecracker (safes only) and Security Expert (security devices only) Tonic lines will reduce the number of Alarm Tiles when hacking.
- The Focused Hacker, Hacking Expert, Safecracker (safes only) and Security Expert (security devices only) Tonic lines will reduce the number of Overload Tiles when hacking.
- The Hacker's Delight line of Tonics will partially or fully restore the player's Health and EVE after a successful hack. This bonus does not activate if the player has hacked a Turret or a Security Bot after researching them to level 4.
- Natural Camouflage can be used to remain undetected if the player has accidentally hit an alarm tile. Additionally, it allows the user to hack without fear of being attacked.
- The Security Evasion line of Tonics will delay the time it will take for a Security Camera to initiate an alarm after spotting the player, making escape and retreats from a failed approach easier.
- The Speedy Hacker line of Tonics will reduce the fluid's flow speed when hacking.
- The Vending Expert line of Tonics will decrease the buyout price when hacking.
Hacking Alternatives[]
If for whatever reason one wants to bypass the hacking minigame but has neither enough money to buy out the machine nor any Automatic Hack Tools, there are several alternatives:
Vending Machines[]
- Normal hacking benefit: reduced prices, more items available.
- Alternative: Vending Expert 1 and 2 will reduce Vending Machine prices, but won't unlock access to special items.
Turrets and Security Bots[]
- Normal hacking benefit: Turrets and Bots fight for the player.
- Alternative: Researching Bots and Turrets up to level 4 will allow the player to instantly and successfully hack them. Security Bullseye will also switch the attention of the security system from the player to the target.
U-Invents[]
- Normal hacking benefit: Required number of components brought down individually by 1, to a minimum of 1.
- Alternative: Prolific Inventor and Clever Inventor allow the player to invent more items with less components.
Security Cameras[]
- Normal hacking benefit: Cameras send Bots against Splicers.
- Alternative: Security Bullseye will turn every nearby security device against the target (including Big Daddies, who aren't normally targeted by the security system). Security Evasion 1 and 2 will allow the player to run past Cameras without setting them off. Shorten Alarms 1 and 2 and Natural Camouflage will reduce the annoyance if one does trigger an alarm.
Health Stations[]
- Normal hacking benefit: Reduced price for healing, kills Splicers that try to use it.
- Alternative: Firing a proximity mine, one or more Trap Bolts or Cyclone Trap near a health station will kill or severely injure splicers that go running toward the health station along with anyone nearby. However, this will not reduce the healing price, is resource-costly and carries the risk of destroying the health station.
BioShock 2[]
- Main article: BioShock 2
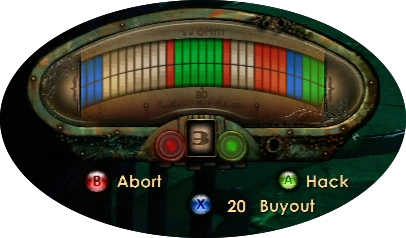
Hacking makes a return in BioShock 2. However, the minigame is completely different to the one present in the original. The new minigame takes place in real-time and takes the form of a horizontal bar at the bottom of the screen with a needle moving back and forth across it. The objective is to land the needle in a specific area in the bar. There are four different outcomes depending on the color of the area the needle lands in:
- If Green, then the hack will succeed. This area type is abundant to rare and will get smaller as the player progresses.
- If Blue, then the hack will succeed and the player will receive another bonus related to the hacked device (see below). This area type is the rarest in the game and will get smaller as the player progresses.
- If White, then the hack will abort, inflicting damage upon the player. This area is more abundant than the previous two and will get larger as the player progresses.
- If Red, then the hack will abort and the machine will initiate an alarm against the player. This area is rarer than the white areas but will get larger as the player progresses to the point where it will become the most common area in the minigame.
There is also a time limit in the minigame, as noted by the number in the middle of the hack bar. The hack will abort at the end of it if the player does not select a spot for the needle to land. By pressing a button, the player will reset the hack bar, discarding the current one in favor of another with a different layout. It is also still possible to buy the machine out as in the original game.
Recommended Plasmids[]
- Electro Bolt will temporarily stun machinery, allowing the player to initiate a hack. However, it will also deal damage to the device.
- Winter Blast will temporarily stun machinery and slow down the speed of the needle while hacking. It also has the advantage of not dealing any damage to the device (Note: This works both on security devices and vending machines).
- Decoy and Security Command will temporarily distract any security device in the area, allowing the player to hack them all. This does not deal direct damage to the device, however, if there are several machines they may accidentally shoot each other, or if Splicers get attacked, they may retaliate against the machines.
Recommended Gene Tonics[]
- The Careful Hacker line of tonics will make the needle move slower.
- EZ-Hack will make the green and blue zones slightly larger.
- The Hacker's Delight line of tonics will give the player a boost of Health and EVE once the hack is completed.
- Quik-Hack will reduce the number of stages when hacking.
- Hurried Hacker will complete a hack instantly when the hacking needle hits a blue zone.
- Hardy Machines will give hacked Turrets and bots more health.
- Handyman will make it possible to repair hacked Turrets and bots for a small cost of EVE, as well as giving them random names.
- Deadly Machines will make hacked Turrets and bots cause more damage.
Area-Specific Hack Bonuses[]
Security Bot[]
- Blue: 20% Increased damage against enemies.
- Green or Blue: Bot becomes friendly to the player and will assist them in combat.
Security Camera[]
- Blue: Increases the duration of friendly alarms by this Camera.
- Green or Blue: Camera becomes friendly to the player and will initiate an alarm upon detecting an enemy.
Turret[]
- Blue: 20% increased Turret damage.
- Green or Blue: Turret becomes friendly to the player and will attack any enemy on sight.
Vending Machine[]
- Blue: Machine gives out a free item.
- Green or Blue: Player receives a discount in prices and can buy previously inaccessible items.
Safe[]
- Blue: Safe will grant a cash bonus upon opening.
- Green or Blue: Safe opens, offering its contents to the player.
Health Station[]
- Blue: Station drops a free First Aid Kit.
- Green or Blue: Price of a Health refill reduced from 15 to 9 Dollars. The station will also damage enemies who attempt to use it.
Strategy[]
- It is possible to reset the hack bar, offering a potentially better-colored sequence. It is recommended to do so if there is too small an amount of green and/or blue areas. However, avoid resetting if not necessary, as one may end up with an even worse layout.
- If the player is trying to reach a very small area, try aiming for the space just before the target. By the time one reacts and stops the needle, it will have landed on the desired area.
- Never attempt to hack a machine at point-blank range when in combat. Not only does this leave the player completely vulnerable to damage, but it also grounds them to the object during the hack. However, it is recommended to do this when not in combat as it does not require the use of ammunition.
- Automatic Hack Darts are best used sparingly, preferably in life-threatening situations where the only option is to instantly hack a device. When using this ammo type there is no need to take cover, as the hack is instantaneous and guaranteed successful.
- When using Remote Hack Darts, always take cover during the hack, as it takes place in real time.
- It is possible to intentionally land the needle on a red area while hacking a machine to gain a free supply of Security Bots, or dispose of a target by painting them with Security Command after doing this.
- If the player has accidentally landed the needle on a red area, successfully hacking the machine will turn off the resulting security alarm.
- The Scout Plasmid can be used to hack machines at level 2. Getting a shock will force the ghost back into Delta's body.
Bugs / Glitches[]
-
 In the PC version of BioShock 2, setting a different key binding for "use" will confuse the key binding for landing the needle during the hacking minigame. During the small tutorial the first time the player hacks, they will be told to press the key they bound for "use." However, the only way to land the needle is clicking the left mouse button.[1]
BioShock 2 Multiplayer[]
- Main article: BioShock 2 Multiplayer

The player hacking a Turret in the multiplayer.
Hacking appears in BioShock 2 Multiplayer, as a much simpler rendition of the single-player form of hacking. Attempting to hack a machine in multiplayer does not result in a minigame, but instead, a loading bar on the screen. Once the bar is full, the hack is complete and the machine is friendly to the player.
Strategy[]
- Avoid hacking if there are enemies in the area. The exception to this rule is if the player hasn't been spotted or is receiving support from teammates.
- Since Turrets cannot detect enemies from behind in the multiplayer, it is best to approach them from behind to hack them. However, if this cannot be achieved use a Plasmid capable of stunning or distracting the Turret, then get behind it to start hacking.
- Note: Do not try to hack a Turret from the front, even if it has been stunned, as it will start attacking the player.
Gallery[]
BioShock[]
")
")
")
")
")
")
")
")
")
Behind the Scenes[]
- The Pipe Dream hacking mini-game is actually a small remnant of the notion that all machines in Rapture were actually run by little, mutated slaves inside them. The idea was that the player was increasing ADAM flow to the person, and that person was giving extra benefits as gratitude.[2]
- In BioShock, it is possible to encounter hacks that are impossible to complete. The player will be subject to hazardous tiles positioned in a 'V' formation. This occurrence usually only appears when hacking safes.
- Due to technical constraints, downloading The Protector Trials or the Minerva's Den DLC updated the hacking interface for BioShock 2 to be more readable to colorblind players. Stripes were added to the red areas.[3] The colorblind mode was removed in the remaster.
- The configuration file for the Minerva's Den contains code for easy hacking, likely for developers use only. There are settings for a type of hack called "HackyBirthday" and its settings are used within the hack called "AllBlueAllaTime." HackyBirthday sets the slowest cursor speed with the only zone type being blue. AllBlueAllaTime is simply the container for this hack, with default unused variables within.
References[]
- ↑ BioShock 2 Hack Keybinding Bug – FIX/Workaround article by Riyad Kalla on The Break It Down Blog
- ↑ Five Cut Features on IrrationalGames.com
- ↑ Steve Gaynor on the 2K Forums "It was in fact "secretly" fixed. The reason it's not publicized is that buying the DLC (Protector Trials or the upcoming Minerva's Den) is required to get the fixed hacking. This is due to a technical constraint meaning that we couldn't put the fix in a free title update (we would've had to re-distribute all of the levels, basically, because of how our data structure is set up, and I don't think that title updates can contain content at all, only code.) But, we figured better to fix it for some people than no one, so there you have it."